User Guide
Introduction
Welcome to VitalConnect, your all-in-one desktop application for efficient clinic management, optimized for both Command Line Interface (CLI) and Graphical User Interface (GUI).
Designed to streamline your clinic management tasks, VitalConnect offers the speed of a CLI with the convenience of a GUI, allowing you to effortlessly organize your patients and appointments with just a few keystrokes. With its intuitive interface and robust features, you can add, delete, and search for appointments, track medical information, as well as check patient contact for communication with ease.
So, whether you’re a busy professional juggling multiple appointments, VitalConnect is here to simplify your life. Let’s dive in and explore how VitalConnect can revolutionize the way you manage your appointments and patients.
Quick start
For developers, you can head over to our Developer Guide here for the technical details.
For first-time users, you can first go through the steps listed under Installation and then check out the table of contents to experiment with whichever command that you are interested in.
Table of Contents
- Introduction
- Quick start
- Commands
- Timetable
- FAQ
- Known issues
- Command summary
Installation
-
Ensure you have Java
11or above installed on your Computer. You learn how to do so here -
Download the latest
vitalconnect.jarfrom here. -
Copy the file to the folder you want to use as the home folder for your VitalConnect.
-
Open a command terminal or learn how to do so here
-
Type
cdfollowed by the location of the folder that you are putting thevitalconnect.jarfile in. Find out more here -
Type
java -jar vitalconnect.jarand press Enter to launch Java and run the application. A GUI should appear in a few seconds. The calendar view will only be shown if the right panel is large enough. You can resize the panel by dragging the divider between the two panels. More instructions can be found in theTimetablesection. (Note that your application might contain different initial placeholder data)
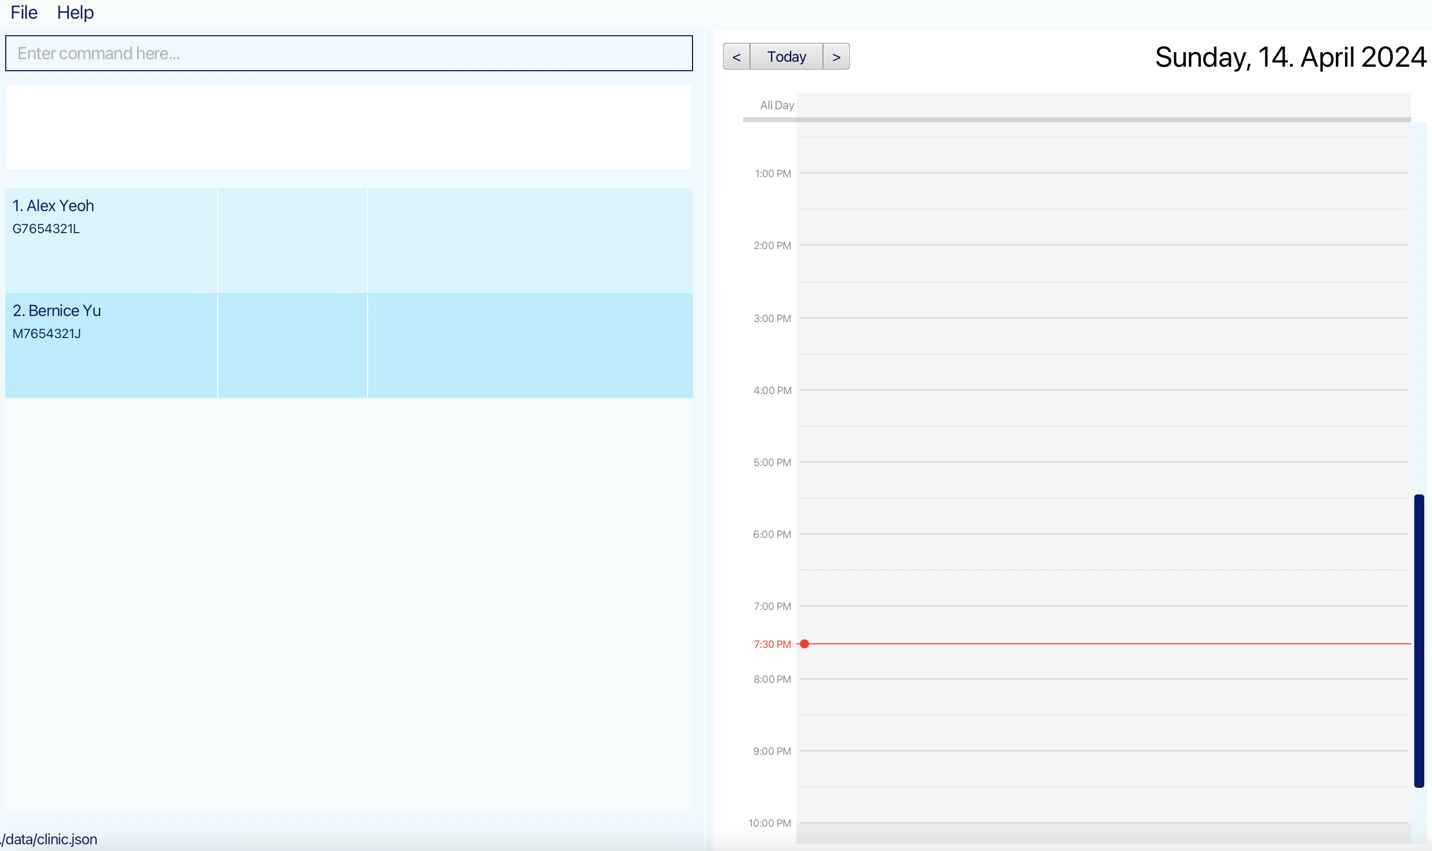
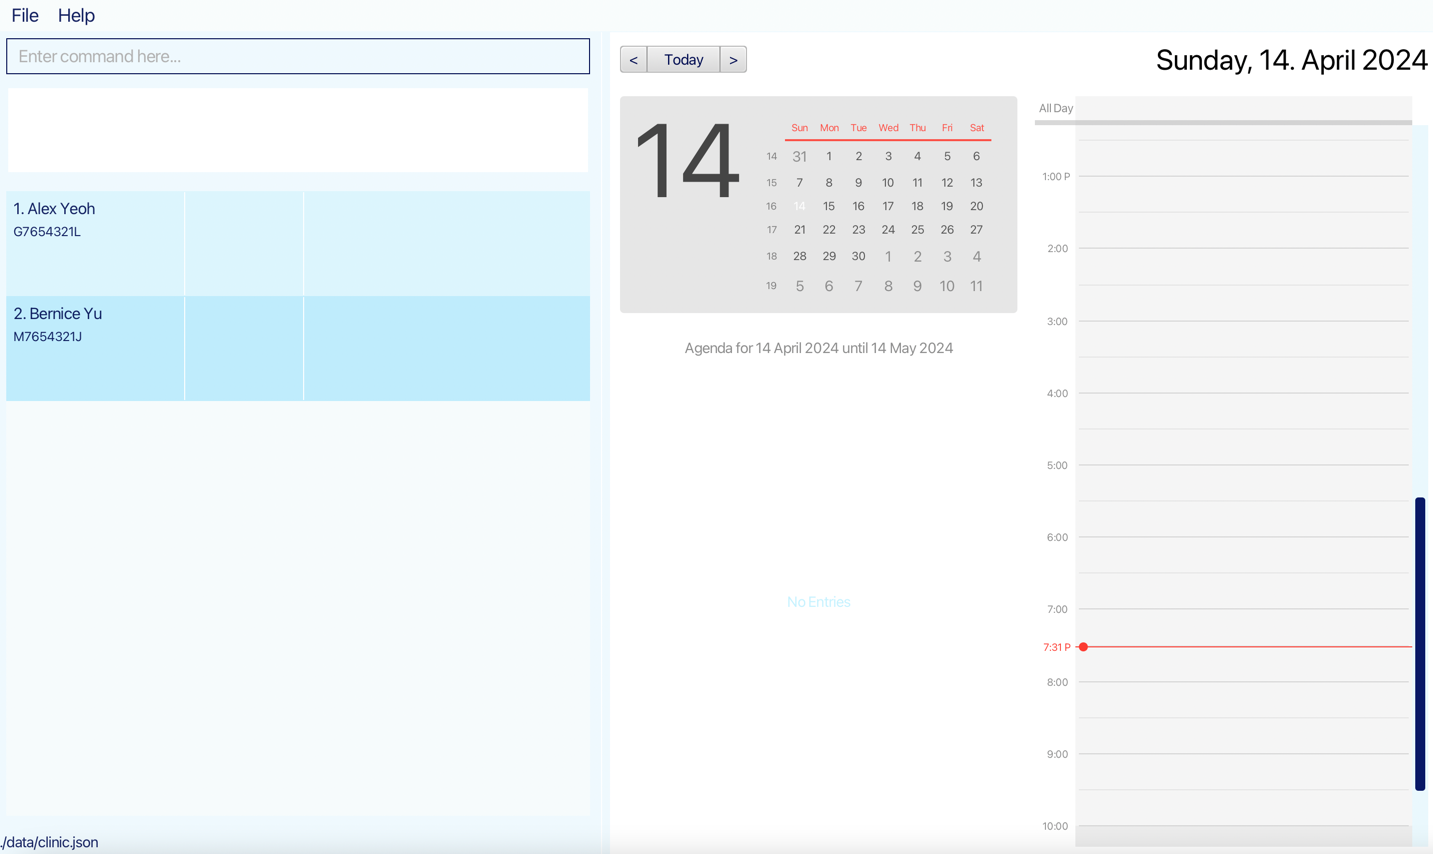
You can type commands in the command box and press Enter to execute it. e.g. typing help and pressing Enter will open the help window.
Some example commands you can try:
-
list: Lists all patients. -
add n/John Doe ic/S1234567D: Adds a patient namedJohn Doewith nricS1234567Dto the Clinic. -
delete 3: Deletes the 3rd patient shown in the current list. -
clear: Deletes all patients. -
exit: Exits the app.
Refer to the Commands below for specific details for each of the commands.
Commands
![]() General notes about the command format:
General notes about the command format:
-
Words in
UPPER_CASEare the parameters to be supplied by you.
e.g. inadd n/NAME ic/NRIC,NAMEandNRICare parameters which can be used asadd n/John Doe ic/S1234567D. -
Parameters can be in any order.
e.g. if the command specifiesic/NRIC p/PHONE_NUMBER,p/PHONE_NUMBER ic/NRICis also acceptable. -
Extraneous parameters for commands that do not take in parameters (such as
help,list,exitandclear) will be ignored.
e.g. if the command specifieshelp 123, it will be interpreted ashelp. -
If you are using a PDF version of this document, be careful when copying and pasting commands that span multiple lines as space characters surrounding line breaks may be omitted when copied over to the application.
-
Invalid prefixes may lead to unmatching error messages. For example,
editm ic/S1234567D H/8 W/2will result in an error message saying thatNRIC is invalid...instead ofinvalid prefix. This is because the whole partS1234567D H/8 W/2is treated as the NRIC.
Viewing help : help
Shows a message explaining how to access the help page.
Format: help
Patient Management
- The system follows a modular way of saving data. First create a patient using the
addcommand, then use specific commands to add specific information to the patient such as contact and medical information. If there is no need for the information, there is no need to add it but the creation of a patient in the database requires using theaddcommand. - The NRIC of a patient is used to identify the patient so patients can share names but not NRICs.
- The NRIC of a patient must be a valid NRIC. You may find more details about the structure on the Wikipedia page here or check using this online tool here
Adding a patient : add
Adds a patient to the clinic using their identification information.
Format: add ic/NRIC n/NAME
- The NRIC must be a valid NRIC.
- Names should only contain alphanumeric characters and spaces, and it should not be blank.
- We currently do not support symbols or other special characters so you will need to omit them from the name.
- After adding a patient, the current displaying list will be automatically changed to the list of all patients to reflect the changes.
Examples:
add ic/S1234567D n/James Doe
Editing identification information : edit
Edits a patient’s identification information.
Format: edit ic/NRIC n/NAME
- The NRIC must be the NRIC of an already existing patient.
- If you would like to change the NRIC instead of the name, create a new patient using
addand then usedeleteon the outdated version.
Examples:
edit ic/S1234567D n/John Doe
Deleting a patient : delete
Deletes the specified patient from the clinic.
Format: delete INDEX
- Deletes the patient at the specified
INDEX. - INDEX reference: The index corresponds to the position of a patient within the currently displayed patient list. This list may be:
- All patients with non-empty contact information (result of the
listccommand). - All patients with non-empty medical information (result of the
listmcommand). - All patients in the system (result of the
listcommand).
- All patients with non-empty contact information (result of the
- If the display is not currently showing a patient list (for example, it’s showing the appointment list), then the index refers to the last patient list viewed before the switch to the appointment list.
- After the successful deletion of the patient, the list shown in the panel will be updated to the one that the index refers to. It is recommended to display the list of patients (run
list,listc, orlistm) before using thedeletecommand to avoid confusion. - The index must be a positive integer 1, 2, 3, …
If accidentally delete a patient, can use
undo command to recover the deleted patient. Examples:
-
listfollowed bydelete 2deletes the 2nd patient in the clinic. -
find Betsyfollowed bydelete 1deletes the 1st patient in the results of thefindcommand.
Listing all patients : list
Shows a list of all patients in the clinic.
Format: list
Contact Management
For patients that do not require the clinic to contact them in the future such as a patient looking for medication, you can ignore the contact management section as there is no need to store their contact information in the database.
addc command. Instead, you should use the editc command to edit the existing contact information. Adding contact information : addc
Adds the contact information to a patient in the clinic.
Format: addc ic/NRIC [p/PHONE_NUMBER] [e/EMAIL] [a/ADDRESS]
![]() Additional notes about the command format:
Additional notes about the command format:
Items in square brackets are optional.
e.g addc ic/S1234567D p/91234567
- The NRIC must be the NRIC of an already existing patient.
- At least one of the optional fields must be provided.
- If a prefix (i.e.
p/,e/,a/) is included in the command, the value following it should not be empty. If you does not want to add a specific field, do not include its prefix in the command. Otherwise, an error message will be shown as empty values for these fields are not allowed. - Phone numbers should only contain numeric values without any other characters, and it should be 3 to 15 digits long.
- Emails should be of the format local-part@domain and adhere to the following constraints:
- The local-part should only contain alphanumeric characters and these special characters, excluding the parentheses, (+_.-). The local-part may not start or end with any special characters, and the special characters should not be adjacent to each other.
- This is followed by a ‘@’ and then a domain name. The domain name is made up of domain labels separated by periods.
The domain name must:
- end with a domain label at least 2 characters long
- have each domain label start and end with alphanumeric characters
- have each domain label consist of alphanumeric characters, separated only by hyphens, if any.
- Address has a max length of 50 characters, and it should not be empty upon adding. Although in particular cases, the address can be larger than the current limit, 50 characters can meet the needs in most situations. For long addresses that exceed the 50 character limit, the compromise is to use short forms, such as b123 instead of block 123.
Examples:
addc ic/S1234567D p/91234567addc ic/S1234567D p/91234567 e/test@email.com a/123, Clementi Rd, 1234665
Editing contact information : editc
Edits the contact information of a patient in the clinic. It is also used to add or delete certain fields of the contact information.
Format: editc ic/NRIC [p/PHONE_NUMBER] [e/EMAIL] [a/ADDRESS]
![]() Additional notes about the command format:
Additional notes about the command format:
Items in square brackets are optional.
e.g editc ic/S1234567D p/91234567
- At least one of the
optional fieldsmust be provided. - To delete an
optional field, leave theVALUEpart empty. - If the
VALUEpart is not empty, the corresponding patient’s contact field will either be updated or added with the new value. - If all three fields of contact information become empty, the contact information of the patient will be deleted. To add a new contact information, use the
addccommand. - Phone numbers should only contain numeric values without any other characters, and they should be 3 to 15 digits long.
- Emails should be of the format local-part@domain and adhere to the following constraints:
- The local-part should only contain alphanumeric characters and these special characters, excluding the parentheses, (+_.-). The local-part may not start or end with any special characters, and the special characters should not be adjacent to each other.
- This is followed by a ‘@’ and then a domain name. The domain name is made up of domain labels separated by periods.
The domain name must:
- end with a domain label at least 2 characters long
- have each domain label start and end with alphanumeric characters
- have each domain label consist of alphanumeric characters, separated only by hyphens, if any.
- Address has a max length of 50 characters, and it should not be empty upon adding. Although in particular cases, the address can be larger than the current limit, 50 characters can meet the needs in most situations. For long addresses that exceed the 50 character limit, the compromise is to use short forms, such as b123 instead of block 123.
Examples:
-
editc ic/S1234567D p/91234567will result in the phone number of the patient with NRICS1234567Dbeing updated to91234567. -
editc ic/S1234567D a/will delete the address of the patient with NRICS1234567DBack to table of contents
Deleting contact information : deletec
Deletes the contact information of a patient in the clinic.
Format: deletec ic/NRIC
Examples:
-
deletec ic/S1234567Dwill result in the deletion of the contact information of the patient with the NRICS1234567D.
Listing contact information : listc
Lists all patients with contact information.
Medical Information Management
Adding medical information : addm
Adds the medical information to a patient in the clinic.
Format: addm ic/NRIC h/HEIGHT w/WEIGHT [t/ALLERGY]…
- The NRIC must be a NRIC of an already existing patient.
- The value HEIGHT should only contain alphanumerical measured in cm, and should be bigger than 0 and smaller than 300.
- The value WEIGHT should only contain alphanumerical measured in kg, and should be bigger than 0 and smaller than 650.
- The allergy tag should be a single word of alphanumeric characters and no space.
![]() Additional notes about the command format:
Additional notes about the command format:
Items in square brackets are optional.
e.g addm ic/S1234567D h/163 w/50
Items with … after them can be used multiple times including zero times.
e.g. t/ALLERGY… can be used as (i.e. 0 times), t/Amoxicillin, t/insulin t/iodine etc.
Examples:
addm ic/S1234567D h/163 w/50addm ic/S1234567D h/163 w/50 t/insulin t/iodine
Editing medical information : editm
Edit the medical information of an existing patient.
Format: editm ic/NRIC [h/HEIGHT] [w/WEIGHT] [-o] [at/ALLERGY…]
- At least one of the optional fields must be provided.
- The value HEIGHT should only contain alphanumerical measured in cm, and should be bigger than 0 and smaller than 300.
- The value WEIGHT should only contain alphanumerical measured in kg, and should be bigger than 0 and smaller than 650.
- The overwrite notation
-oshould only appear once. -
-ocan be placed at any position in the command. - All allergy tag should be a single word of alphanumeric characters and no space.
-o will delete all existing tag, including the added tag in current command before it. Tag words which are longer than 45 characters (longest English word) may not be displayed properly as they will be cut out by the UI.
It is recommended to use short and concise tag word
![]() Additional notes about the command format:
Additional notes about the command format:
Items in square brackets are optional.
e.g editm ic/S1234567D h/130 w/100
Prefix explanation:
-
w/WEIGHT,h/HIGHT: Change the current wight and height value to WEIGHT and HEIGHT. -
at/ALLERGY: Append this tag to existing tag. -
-o: Set mode for this command to overwrite, meaning all existing tag will be deleted and replaced by the new tags.
Example:
editm ic/S1234567D w/100 -o at/milk at/egg
This will change the weight of the patient with NRIC S1234567D to 100 and
overwrite the allergy tag to milk and egg. Take note that commands achieving the same effect could be editm ic/S1234567D w/100 at/milk at/egg -o or editm ic/S1234567D -o w/100 at/milk at/egg.
Deleting medical information : deletem
Deletes the medical information of a patient in the clinic.
Format: deletem ic/NRIC
Examples:
-
deletec ic/S1234567Dwill result in the deletion of the medical information of the patient with the NRICS1234567D.
Listing medical information : listm
Lists all patients with medical information.
Appointment Management
Adding an appointment : adda
Adds an appointment for an existing patient to the appointment list.
Format: adda ic/NRIC s/START_TIME d/DURATION
ic/NRIC: Patient’s NRIC
- The patient(ic) should already exist in the patient list.
s/START_TIME: Start time of the appointment
- The start time should be in the format: DD/MM/YYYY HHmm.
- The start time should be a valid date. (e.g. 31/02/2024 is not valid as the date is not exist)
- The start time should not be earlier than now time.
- The appointment time period should not overlap with other appointments.
d/DURATION: the time length of the appointment
The input should be the number of duration unit:
- The time length of one unit of duration equals 15 minutes.
- The input for duration should be a positive integer.
- The limitation of the input duration is 96 (24 hours).
Examples:
adda ic/S1234567D s/02/06/2024 1300 d/2- This will add an appointment for the patient with NRIC
S1234567Dstarting from 2nd June 2024 at 1:00 PM and ending at 1:30 PM.
Editing an appointment : edita
Edits the start time and/or duration of an appointment of an existing patient.
Format: edita INDEX [s/START_TIME] [d/DURATION]
![]() Additional notes about the command format:
Additional notes about the command format:
Items in square brackets are optional.
e.g edita 1 s/02/02/2025 1300
INDEX: Index of the to be edited appointment in the appointment list
- The index should not be out of range or negative.
s/START_TIME: Start time of the appointment
- The start time should be in the format: DD/MM/YYYY HHmm.
- The start time should not be earlier than now time.
- The start time should be a valid date. (e.g. 31/02/2024 is not valid as the date is not exist)
- The edited appointment time period should not overlap with other appointments.
d/DURATION: the time length of the appointment
The input should be the number of duration unit:
- The time length of one unit of duration equals 15 minutes.
- The input for duration should be a positive integer.
- The limitation of the input duration is 96 (24 hours).
Examples:
-
edita 1 s/02/02/2025 1300 d/4- This changes the time of the appointment of index 1 to Feb 2 2025 at 1pm and end at 2pm. -
edita 1 s/02/02/2025 1300- Only change the appointment start time to Feb 2 2025 at 1pm, the time duration remains the same. -
edita 1 d/4- Only change the time length of the appointment to one hour, the start time remains the same.
Deleting an appointment : deletea
Deletes an existing appointment from the appointment list by providing the index of the appointment in the list.
Format: deletea INDEX
- Deletes the appointment at the specified
INDEX. - The index refers to the index number stored in the appointment list, regardless of whether the appointment list is the current showing list in the list displaying panel.
- The index must be a positive integer 1, 2, 3, …
Examples:
deletea 1
List out appointments : lista
List out all the appointments for the clinic.
Format: lista
Other Features
Locating patients by name : find
Finds patients whose names contain any of the given keywords.
Format: find KEYWORD [MORE_KEYWORDS]
- The search is case-insensitive. e.g
hanswill matchHans - The order of the keywords does not matter. e.g.
Hans Bowill matchBo Hans - Only the name is searched.
- Only full words will be matched e.g.
Hanwill not matchHans - Patients matching at least one keyword will be returned (i.e.
ORsearch). e.g.Hans Bowill returnHans Gruber,Bo Yang
Examples:
-
find JohnreturnsJohn DoeandJohn Bard
Locating appointments by patient : finda
Find and list out all the appointments of a specific patient in the appointment list.
Format: finda ic/NRIC
- The NRIC must be the NRIC of an already existing patient.
Examples:
finda ic/S1234567D
Undoing last command : undo
Undoing the last command made.
Format: undo
- Commands such as
listwill not be considered as a command to undo and will undo the command before it if possible. - If you add a patient and then uses the
listcommand. Undo will undo the addition of the patient.
Clearing all entries : clear
Clears all entries from the clinic.
Format: clear
Exiting the program : exit
Exits the program.
Format: exit
Saving the data
Clinic data are saved in the hard disk automatically after any command that changes the data. There is no need to save manually. All of the data is saved automatically as JSON files [JAR file location]/data/clinic.json and [JAR file location]/data/appointments.json. The data is saved into two JSON files, one for patient data and one for appointment data.
Editing the data file
Advanced users are welcome to update data directly by editing the following JSON files, [JAR file location]/data/clinic.json or [JAR file location]/data/appointments.json.
Timetable
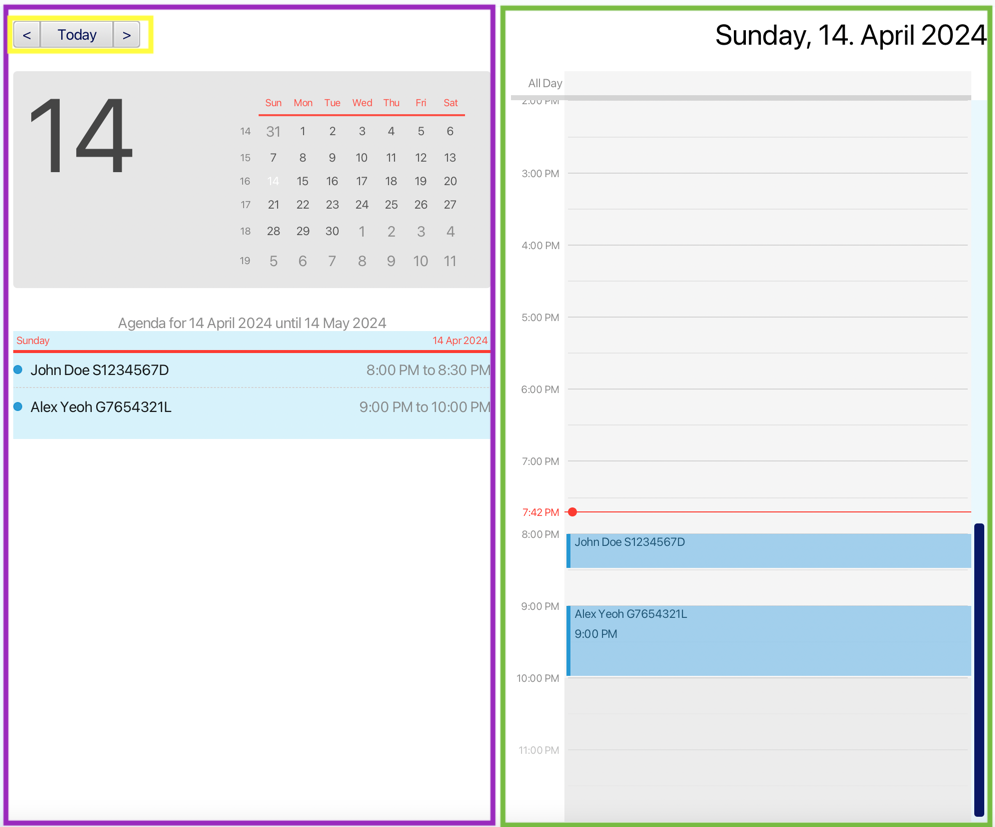
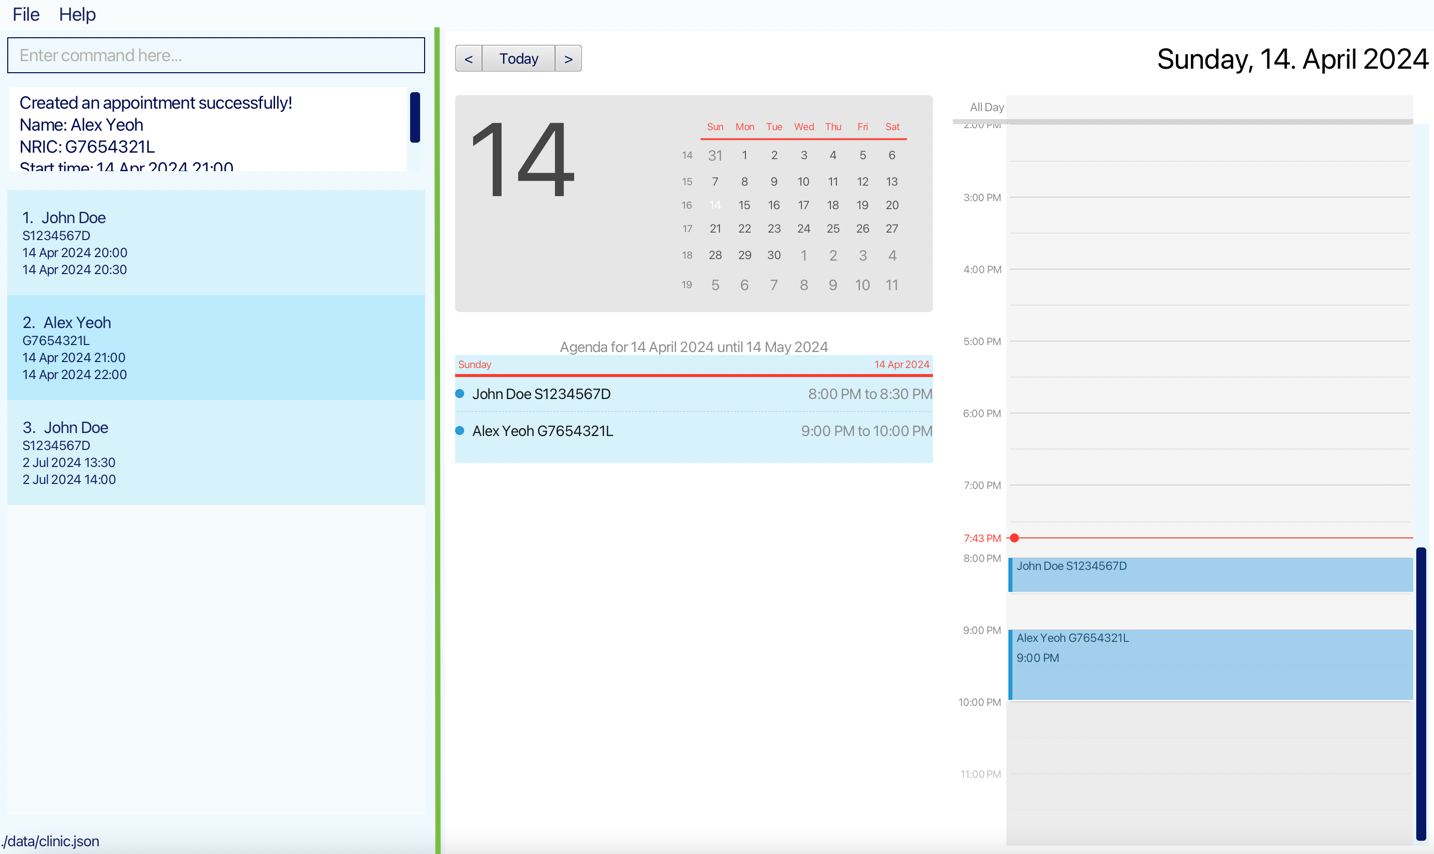
This feature allows you to visualise the appointment throughout the day.
The right part of the timetable (marked by green box) is a visual representation of the appointment for today. Each appointment is represented by a blue box with the patient’s name and NRIC. If the box is large enough, it will also display the appointment’s start time. The height of the box represents the time length of the appointment.
The left part of the timetable (marked by purple box) is a calendar view with agendas for the month including the current day. The complete information for the appointment can be found in the agenda view, including the patient’s name, nric, and the start time and end time of the appointments.
The three buttons on the top left of the timetable (marked by yellow box) allow you to adjust which day to look at by using your mouse.
-
Todaybutton will show the timetable of the current day. -
<button will show the timetable for the previous day. -
>button will show the timetable for the next day.
The timetable also supports changing the view using keyboard shortcuts.
-
Ctrl + Pwill show the timetable for the previous day. -
Ctrl + Nwill show the timetable for the next day. -
Ctrl + Twill show the timetable of the today.
It is worth noting that the left calendar view (marked by purple box in the above image) is only shown when the left panel size is large enough (i.e. larger than 700 pixels). If the calendar is not currently showing, you can resize the panel by dragging the divider in the middle of the application. The divider is highlighted in green in the following two images below.
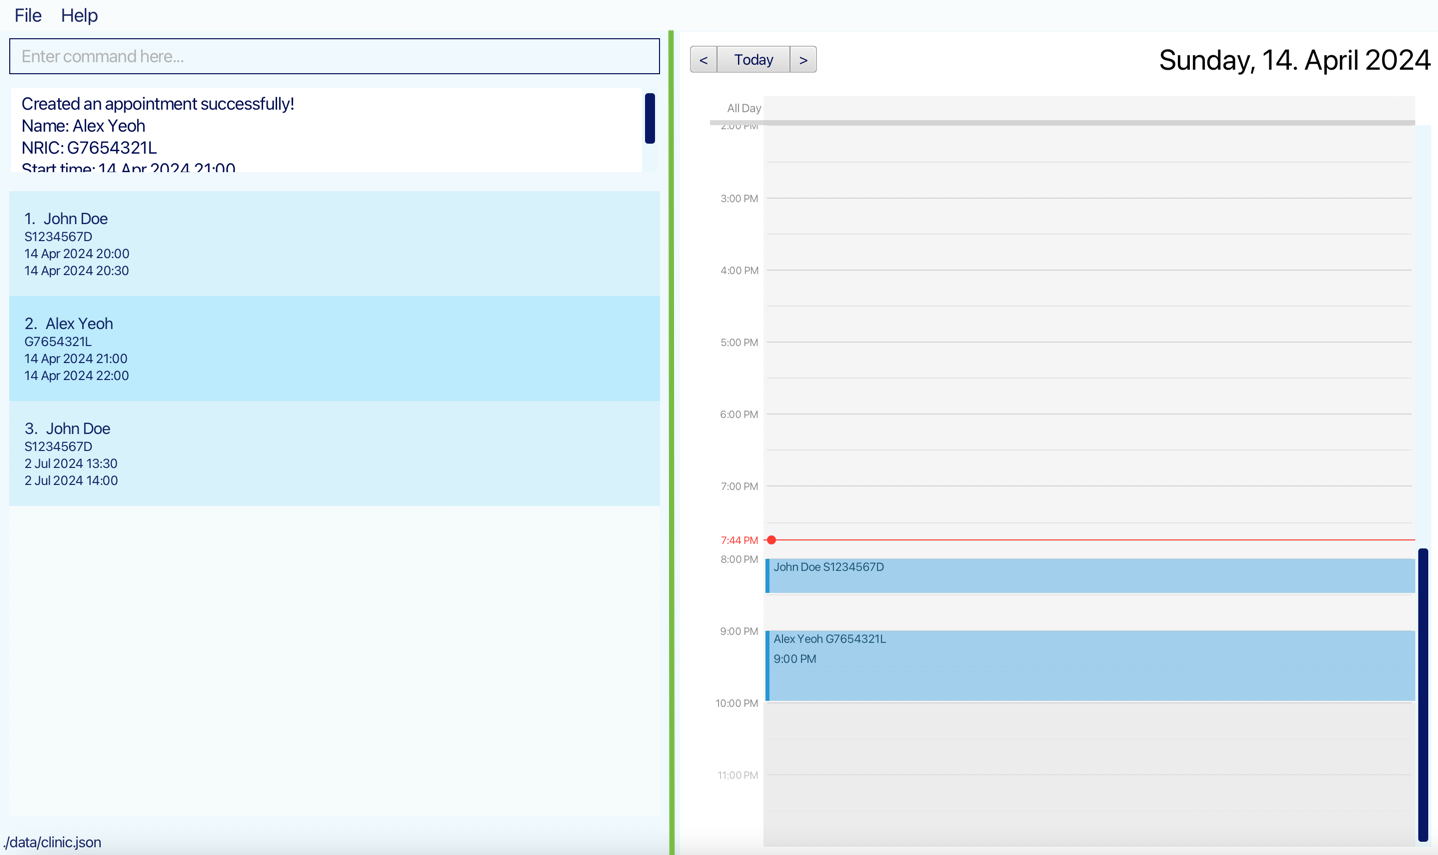
After dragging the divider to the left, the calendar view will be shown.
FAQ
Q: How do I transfer my data to another Computer?
A: Install the app on the other computer and overwrite the empty data file it creates with the file that contains the data of your previous Clinic home folder.
Known issues
-
When using multiple screens, if you move the application to a secondary screen, and later switch to using only the primary screen, the GUI will open off-screen. The remedy is to delete the
preferences.jsonfile created by the application before running the application again.
Command summary
| Action | Format, Examples |
|---|---|
| Help | help |
| Add |
add ic/NRIC n/NAME e.g., add ic/S1234567D n/James Doe
|
| Edit |
edit ic/NRIC n/NAME e.g., add ic/S1234567D n/John Doe
|
| Delete |
delete INDEX e.g., delete 3
|
| List | list |
| Addc |
addc ic/NRIC [p/PHONE_NUMBER] [e/EMAIL] [a/ADDRESS] e.g., addc ic/S1234567D p/91234567 e/test@email.com a/123, Clementi Rd, 1234665
|
| Editc |
editc ic/NRIC [p/PHONE_NUMBER] [e/EMAIL] [a/ADDRESS] e.g., editc ic/S1234567D p/91234567 e/testing@email.com a/Blk 123 Street 4
|
| Deletec |
deletec ic/NRIC e.g., deletec ic/S1234567D
|
| Addm |
addm ic/NRIC h/HEIGHT w/WEIGHT [t/ALLERGY]… e.g., addm ic/S1234567D h/163 w/50 t/insulin t/iodine
|
| Editm |
editm ic/NRIC h/HEIGHT w/WEIGHT [t/ALLERGY]… e.g., editm ic/S1234567D h/165 w/55 t/aspirin
|
| Deletem |
deletem ic/NRIC e.g., deletem ic/S1234567D
|
| Listm | listm |
| Adda |
adda ic/NRIC s/DD/MM/YYYY HHMM d/DURATION e.g., adda ic/S1234567D s/02/02/2024 1300 d/4
|
| Edita |
edita INDEX s/DD/MM/YYYY HHMM d/DURATION e.g., edita 1 s/02/02/2024 1400 d/4
|
| Deletea |
deletea INDEX e.g., deletea 1
|
| Lista | lista |
| Find |
find KEYWORD [MORE_KEYWORDS]e.g., find John Doe
|
| Finda |
finda ic/NRICe.g., finda ic/S1234567D
|
| Undo | undo |
| Clear | clear |
| Exit | exit |